[Day27] k8s應用篇(一):Helm部署apps、HPA和CA
Author: Nick Zhuang
Type: kubernetes
前言
今天開始我們會提些在AWS上可以做k8s的應用,應用篇的部分分為上下兩篇。
應用篇(上):Helm部署apps、HPA與CA的使用(今天)
應用篇(下):EBS與EFS的操作比較(明天)
這裡沒有複習篇了XD,有沒有很開心?
廢話不多說,我們就開始吧!
Helm部署apps
要使用Helm,那麼我們就要先安裝Helm
複習傳送門: [Day18]k8s之管理篇延伸:兩個H的小故事:Harbor與Helm
安裝Helm
下載命令列程式
$curl -L https://git.io/get_helm.sh | bash
% Total    % Received % Xferd  Average Speed   Time    Time     Time  Current
                                    Dload  Upload   Total   Spent    Left  Speed
    0     0    0     0    0     0      0      0 --:--:--  0:00:01 --:--:--     0
100  7034  100  7034    0     0   2868      0  0:00:02  0:00:02 --:--:--  626k
Downloading https://get.helm.sh/helm-v2.14.3-linux-amd64.tar.gz
Preparing to install helm and tiller into /usr/local/bin
[sudo] password for nick:
helm installed into /usr/local/bin/helm
tiller installed into /usr/local/bin/tiller
Run 'helm init' to configure helm.
新增tiller這個namespace
$kubectl create namespace tiller
namespace/tiller created
設定環境變數並Export,執行tiller
$export TILLER_NAMESPACE=tiller
$tiller -listen=localhost:44134 -storage=secret -logtostderr
[main] 2019/10/11 19:07:39 Starting Tiller v2.14.3 (tls=false)
[main] 2019/10/11 19:07:39 GRPC listening on localhost:44134
[main] 2019/10/11 19:07:39 Probes listening on :44135
[main] 2019/10/11 19:07:39 Storage driver is Secret
[main] 2019/10/11 19:07:39 Max history per release is 0
再開另一個新視窗來接續操作:helm初始化與更新
$export HELM_HOST=:44134
$helm init --client-only
Creating /home/nick/.helm
Creating /home/nick/.helm/repository
Creating /home/nick/.helm/repository/cache
Creating /home/nick/.helm/repository/local
Creating /home/nick/.helm/plugins
Creating /home/nick/.helm/starters
Creating /home/nick/.helm/cache/archive
Creating /home/nick/.helm/repository/repositories.yaml
Adding stable repo with URL: https://kubernetes-charts.storage.googleapis.com
Adding local repo with URL: http://127.0.0.1:8879/charts
$HELM_HOME has been configured at /home/nick/.helm.
Not installing Tiller due to 'client-only' flag having been set
$helm repo update
Hang tight while we grab the latest from your chart repositories...
...Skip local chart repository
...Successfully got an update from the "stable" chart repository
Update Complete.
到這邊安裝結束!
使用Helm部署apps
這邊假設我們透過CI/CD的方式,已經將應用程序封裝成Image,並上傳至Docker Hub上
將Istio部署到k8s
這邊我們可以使用Istio,一個開源套件
接著我們透過helm來部署它囉!
$wget https://github.com/istio/istio/releases/download/1.3.1/istio-1.3.1-linux.tar.gz
$tar xf istio-1.3.1-linux.tar.gz
$cd istio-1.3.1/
$ls
bin  install  istio.VERSION  LICENSE  README.md  samples  tools
$helm install install/kubernetes/helm/istio-init --name istio-init --namespace istio-system
NAME:   istio-init
LAST DEPLOYED: Fri Oct 11 20:12:25 2019
NAMESPACE: istio-system
STATUS: DEPLOYED

RESOURCES:
==> v1/ClusterRole
NAME                     AGE
istio-init-istio-system  2s

==> v1/ClusterRoleBinding
NAME                                        AGE
istio-init-admin-role-binding-istio-system  2s

==> v1/ConfigMap
NAME          DATA  AGE
istio-crd-10  1     3s
istio-crd-11  1     3s
istio-crd-12  1     2s

==> v1/Job
NAME                     COMPLETIONS  DURATION  AGE
istio-init-crd-10-1.3.1  0/1          2s        2s
istio-init-crd-11-1.3.1  0/1          2s        2s
istio-init-crd-12-1.3.1  0/1          2s        2s

==> v1/Pod(related)
NAME                           READY  STATUS             RESTARTS  AGE
istio-init-crd-10-1.3.1-ptp6m  0/1    ContainerCreating  0         2s
istio-init-crd-11-1.3.1-k6n67  0/1    ContainerCreating  0         2s
istio-init-crd-12-1.3.1-9tgpt  0/1    ContainerCreating  0         2s

==> v1/ServiceAccount
NAME                        SECRETS  AGE
istio-init-service-account  1        2s
OK,看起來沒啥問題,我們已經成功安裝了Istio這個套件,它具有管理與監控微服務的功能。
原來的視窗可以看到log喔!(沒有手殘把它關掉吧?
[tiller] 2019/10/11 20:12:23 preparing install for istio-init
[storage] 2019/10/11 20:12:23 getting release history for "istio-init"
[tiller] 2019/10/11 20:12:25 rendering istio-init chart using values
2019/10/11 20:12:25 info: manifest "istio-init/templates/job-crd-certmanager-10.yaml" is empty. Skipping.
2019/10/11 20:12:25 info: manifest "istio-init/templates/configmap-crd-certmanager-11.yaml" is empty. Skipping.
2019/10/11 20:12:25 info: manifest "istio-init/templates/configmap-crd-certmanager-10.yaml" is empty. Skipping.
2019/10/11 20:12:25 info: manifest "istio-init/templates/job-crd-certmanager-11.yaml" is empty. Skipping.
[tiller] 2019/10/11 20:12:25 performing install for istio-init
[tiller] 2019/10/11 20:12:25 executing 0 crd-install hooks for istio-init
[tiller] 2019/10/11 20:12:25 hooks complete for crd-install istio-init
[tiller] 2019/10/11 20:12:25 executing 0 pre-install hooks for istio-init
[tiller] 2019/10/11 20:12:25 hooks complete for pre-install istio-init
[storage] 2019/10/11 20:12:25 getting release history for "istio-init"
[storage] 2019/10/11 20:12:25 creating release "istio-init.v1"
[kube] 2019/10/11 20:12:25 building resources from manifest
[kube] 2019/10/11 20:12:25 creating 9 resource(s)
[tiller] 2019/10/11 20:12:26 executing 0 post-install hooks for istio-init
[tiller] 2019/10/11 20:12:26 hooks complete for post-install istio-init
[storage] 2019/10/11 20:12:26 updating release "istio-init.v1"
[storage] 2019/10/11 20:12:26 getting last revision of "istio-init"
[storage] 2019/10/11 20:12:26 getting release history for "istio-init"
[kube] 2019/10/11 20:12:26 Doing get for ConfigMap: "istio-crd-10"
[kube] 2019/10/11 20:12:26 get relation pod of object: istio-system/ConfigMap/istio-crd-10
[kube] 2019/10/11 20:12:26 Doing get for ConfigMap: "istio-crd-11"
[kube] 2019/10/11 20:12:27 get relation pod of object: istio-system/ConfigMap/istio-crd-11
[kube] 2019/10/11 20:12:27 Doing get for ConfigMap: "istio-crd-12"
[kube] 2019/10/11 20:12:27 get relation pod of object: istio-system/ConfigMap/istio-crd-12
[kube] 2019/10/11 20:12:27 Doing get for ServiceAccount: "istio-init-service-account"
[kube] 2019/10/11 20:12:27 get relation pod of object: istio-system/ServiceAccount/istio-init-service-account
[kube] 2019/10/11 20:12:27 Doing get for ClusterRole: "istio-init-istio-system"
[kube] 2019/10/11 20:12:27 get relation pod of object: /ClusterRole/istio-init-istio-system
[kube] 2019/10/11 20:12:27 Doing get for ClusterRoleBinding: "istio-init-admin-role-binding-istio-system"
[kube] 2019/10/11 20:12:27 get relation pod of object: /ClusterRoleBinding/istio-init-admin-role-binding-istio-system
[kube] 2019/10/11 20:12:27 Doing get for Job: "istio-init-crd-10-1.3.1"
[kube] 2019/10/11 20:12:27 get relation pod of object: istio-system/Job/istio-init-crd-10-1.3.1
[kube] 2019/10/11 20:12:27 Doing get for Job: "istio-init-crd-11-1.3.1"
[kube] 2019/10/11 20:12:27 get relation pod of object: istio-system/Job/istio-init-crd-11-1.3.1
[kube] 2019/10/11 20:12:27 Doing get for Job: "istio-init-crd-12-1.3.1"
[kube] 2019/10/11 20:12:28 get relation pod of object: istio-system/Job/istio-init-crd-12-1.3.1
好了就將它恢復原狀吧~
$helm delete --purge istio-init
release "istio-init" deleted
$kubectl delete namespace istio-system
namespace "istio-system" deleted
接著我們看下個主題囉
HPA(Horizontal Pod Autoscaling)
前置準備:安裝metrics-server
需要先透過Helm安裝metrics-server(記得log視窗要保留
$helm install stable/metrics-server \
        --name metrics-server \
        --version 2.0.4 \
        --namespace metrics
NAME:   metrics-server
LAST DEPLOYED: Fri Oct 11 20:55:34 2019
NAMESPACE: metrics
STATUS: DEPLOYED

RESOURCES:
==> v1/ClusterRole
NAME                   AGE
system:metrics-server  2s

==> v1/ClusterRoleBinding
NAME                                  AGE
metrics-server:system:auth-delegator  2s
system:metrics-server                 2s

==> v1/Pod(related)
NAME                             READY  STATUS             RESTARTS  AGE
metrics-server-5b5bfd85cf-rszzh  0/1    ContainerCreating  0         1s

==> v1/Service
NAME            TYPE       CLUSTER-IP      EXTERNAL-IP  PORT(S)  AGE
metrics-server  ClusterIP  10.100.213.252  <none>       443/TCP  1s

==> v1/ServiceAccount
NAME            SECRETS  AGE
metrics-server  1        2s

==> v1beta1/APIService
NAME                    AGE
v1beta1.metrics.k8s.io  1s

==> v1beta1/RoleBinding
NAME                        AGE
metrics-server-auth-reader  2s

==> v1beta2/Deployment
NAME            READY  UP-TO-DATE  AVAILABLE  AGE
metrics-server  0/1    1           0          1s
驗證一下安裝
$kubectl get apiservice v1beta1.metrics.k8s.io -o yaml
apiVersion: apiregistration.k8s.io/v1
kind: APIService
metadata:
    creationTimestamp: "2019-10-11T12:55:36Z"
    labels:
    app: metrics-server
    chart: metrics-server-2.0.4
    heritage: Tiller
    release: metrics-server
    name: v1beta1.metrics.k8s.io
    resourceVersion: "12588"
    selfLink: /apis/apiregistration.k8s.io/v1/apiservices/v1beta1.metrics.k8s.io
    uid: 6b2ffabe-ec26-11e9-a272-06cc30a35306
spec:
    group: metrics.k8s.io
    groupPriorityMinimum: 100
    insecureSkipTLSVerify: true
    service:
    name: metrics-server
    namespace: metrics
    version: v1beta1
    versionPriority: 100
status:
    conditions:
    - lastTransitionTime: "2019-10-11T12:55:40Z"
    message: all checks passed
    reason: Passed
    status: "True"
    type: Available
OK,看起來沒問題
啟動HPA並測試
啟動Deployment,測試用,每個Pod會佔用cpu一部份的資源,並開放80端口
$kubectl run php-apache --image=k8s.gcr.io/hpa-example --requests=cpu=200m --expose --port=80
service/php-apache created
deployment.apps/php-apache created
啟動HPA,以cpu百分之五十為基準Scale up,最小數量1,最大Scale到10
$kubectl autoscale deployment php-apache --cpu-percent=50 --min=1 --max=10
horizontalpodautoscaler.autoscaling/php-apache autoscaled
檢查HPA狀態,等它沒有Unknown我們再繼續
$kubectl get hpa
NAME         REFERENCE               TARGETS         MINPODS   MAXPODS   REPLICAS   AGE
php-apache   Deployment/php-apache   <unknown>/50%   1         10        0          9s
$kubectl get hpa
NAME         REFERENCE               TARGETS         MINPODS   MAXPODS   REPLICAS   AGE
php-apache   Deployment/php-apache   <unknown>/50%   1         10        1          89s
$kubectl get hpa
NAME         REFERENCE               TARGETS   MINPODS   MAXPODS   REPLICAS   AGE
php-apache   Deployment/php-apache   0%/50%    1         10        1          103s
如果沒裝前面的metric-server,會一直是Unknown的狀態,請特別注意
接著我們開啟一個busybox,並在裡面下指令如下
$kubectl run -i --tty load-generator --image=busybox /bin/sh
/ # while true; do wget -q -O - http://php-apache; done
這時候應該會顯示如下
OK!OK!OK!OK!OK!OK!OK!OK!OK!OK!OK!OK!OK!OK!OK!OK!OK!OK!OK!OK!OK!OK!OK!OK!OK!OK!OK!OK!OK!OK!OK!OK!OK!接著開另一個視窗,檢查HPA狀態
$kubectl get hpa -w
NAME         REFERENCE               TARGETS   MINPODS   MAXPODS   REPLICAS   AGE
php-apache   Deployment/php-apache   0%/50%    1         10        1          3m6s
php-apache   Deployment/php-apache   483%/50%  1         10        1          3m31s
php-apache   Deployment/php-apache   483%/50%  1         10        4          3m46s
php-apache   Deployment/php-apache   483%/50%  1         10        8          4m1s
php-apache   Deployment/php-apache   483%/50%  1         10        10         4m16s
php-apache   Deployment/php-apache   51%/50%   1         10        10         4m31s
php-apache   Deployment/php-apache   0%/50%    1         10        10         5m31s
php-apache   Deployment/php-apache   0%/50%    1         10        10         10m
php-apache   Deployment/php-apache   0%/50%    1         10        1          10m
可以發現它會自動Scale up到10個,我們取消OK的話,它會慢慢恢復原狀。
OK,測試結束囉~
CA(Cluster AutoScaler)
這是所謂的群集自動拓展器,當集群內負載過重的時候,就可以自動拓展節點,也就是Slave,進而降低群集的整體負擔唷!
下載CA設定
$mkdir ca
$cd ca
$wget https://eksworkshop.com/scaling/deploy_ca.files/cluster_autoscaler.yml
等下ASG創好後,需將該YAML中的AUTOSCALING GROUP NAME替換掉
建立ASG(Auto Scaling Group)
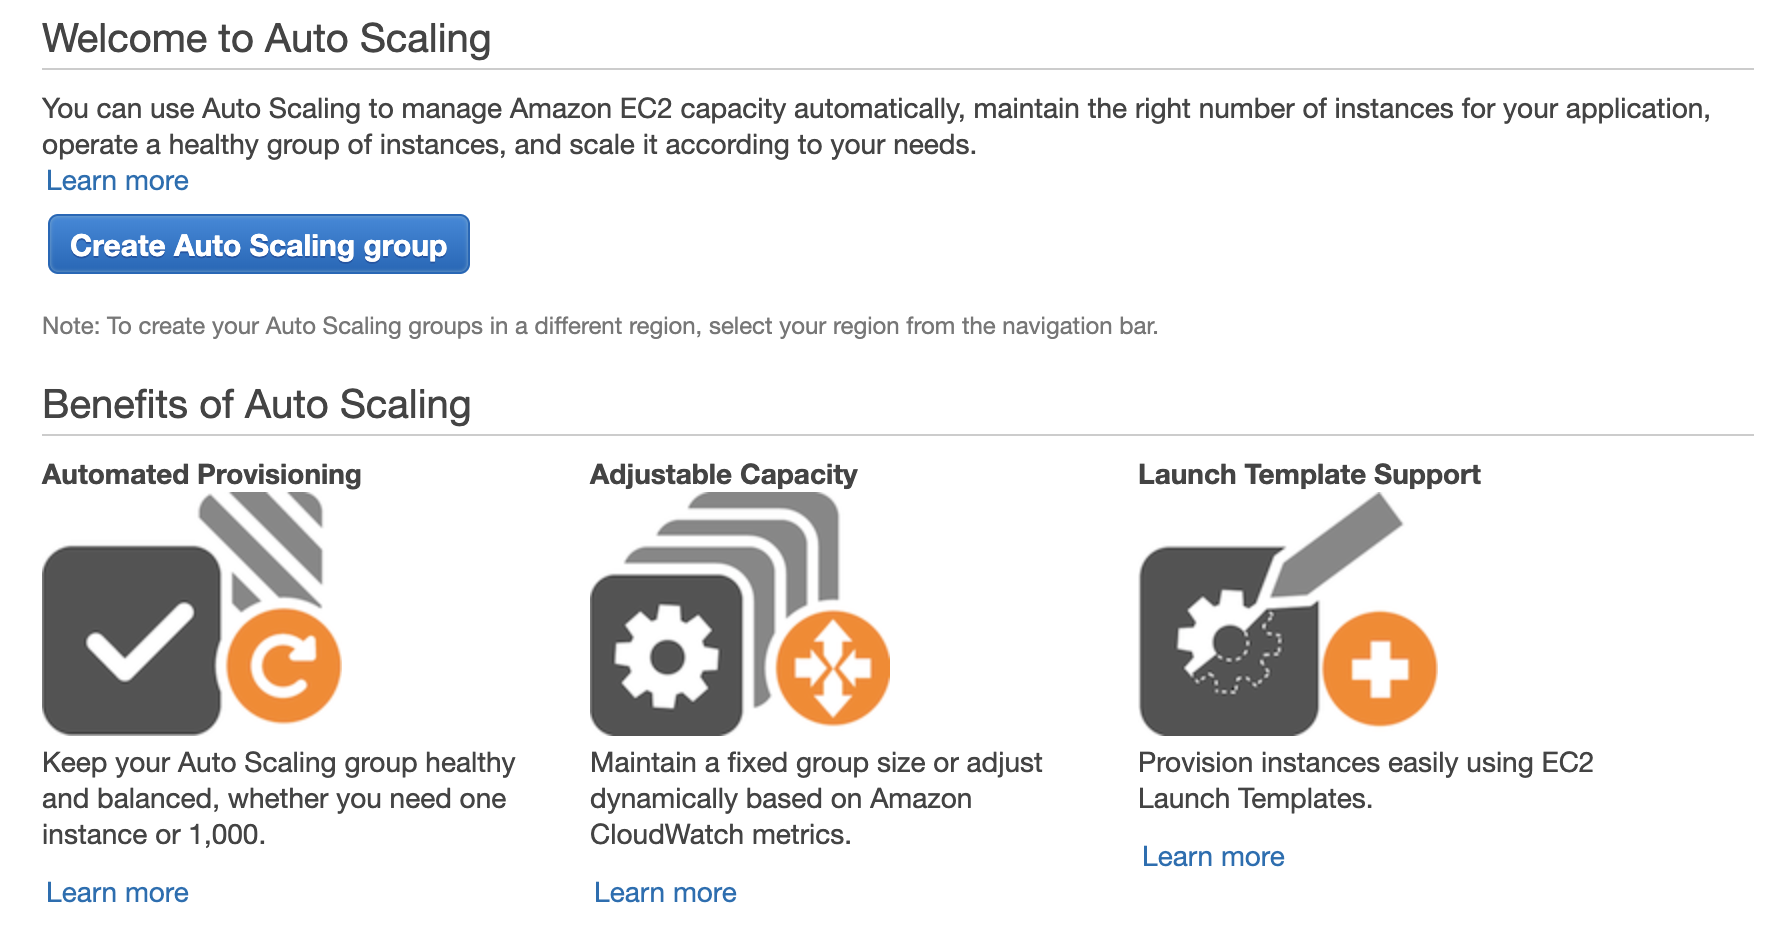
從 這裡 開始設置,Create Auto Scaling group
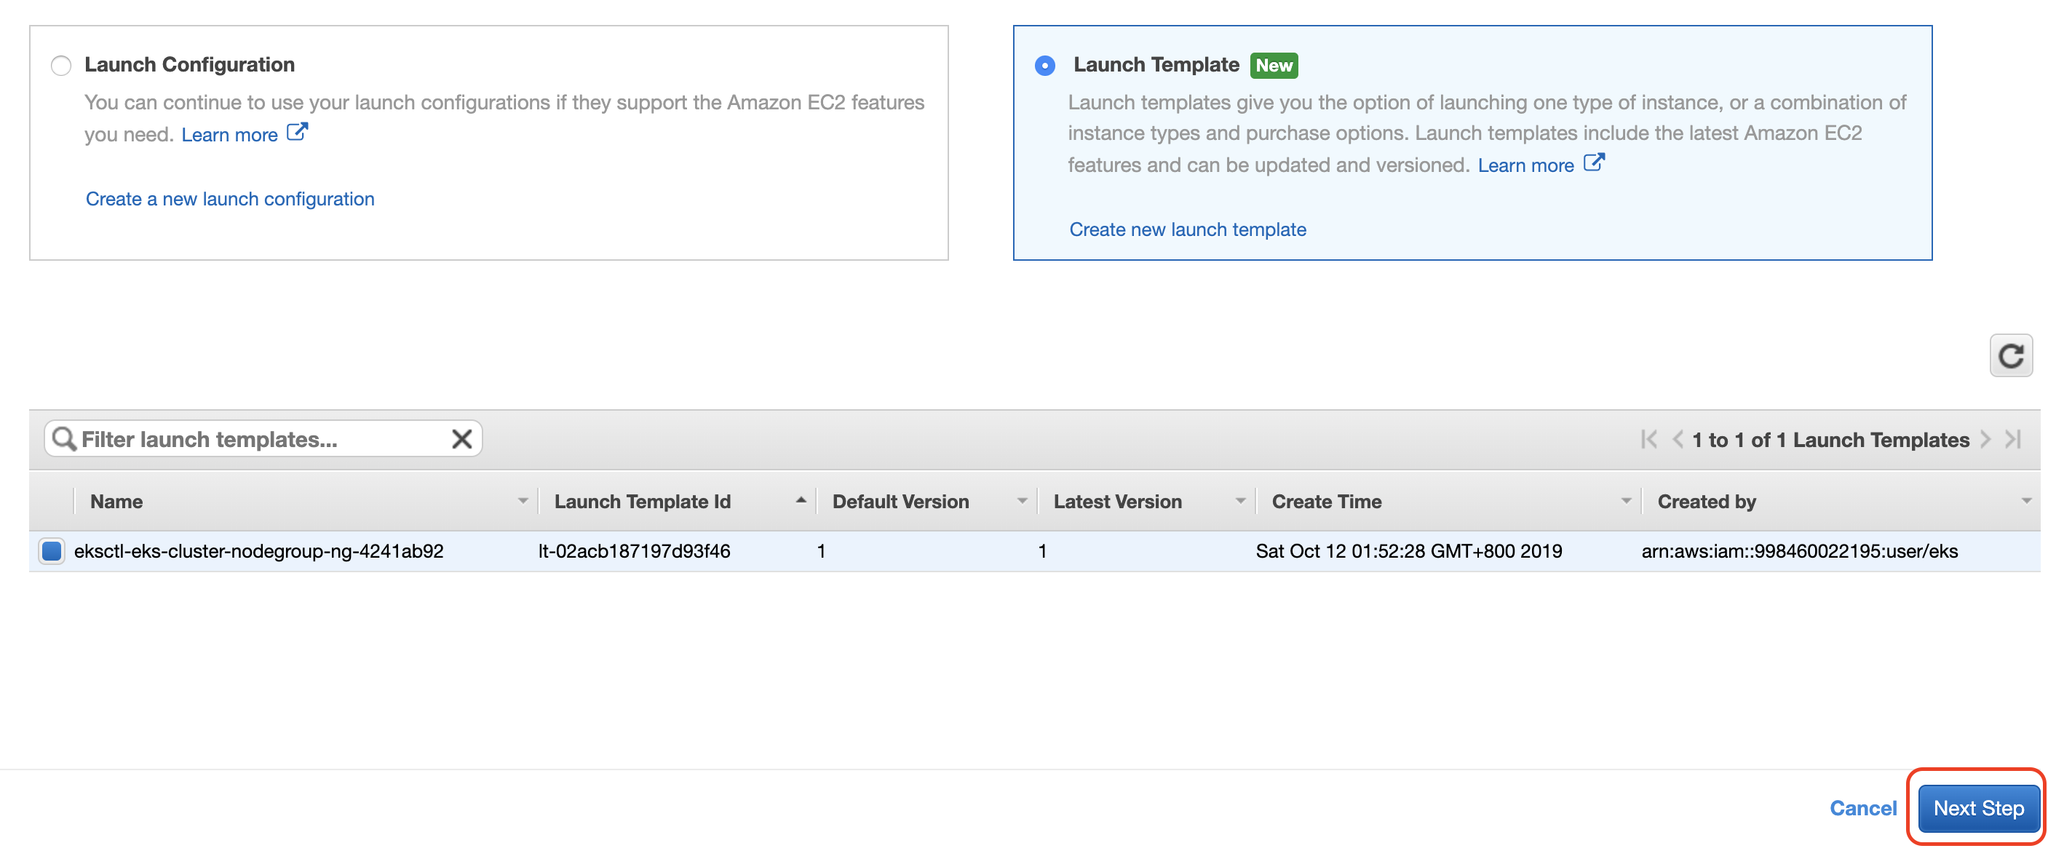
接著選擇Launch Template,Next
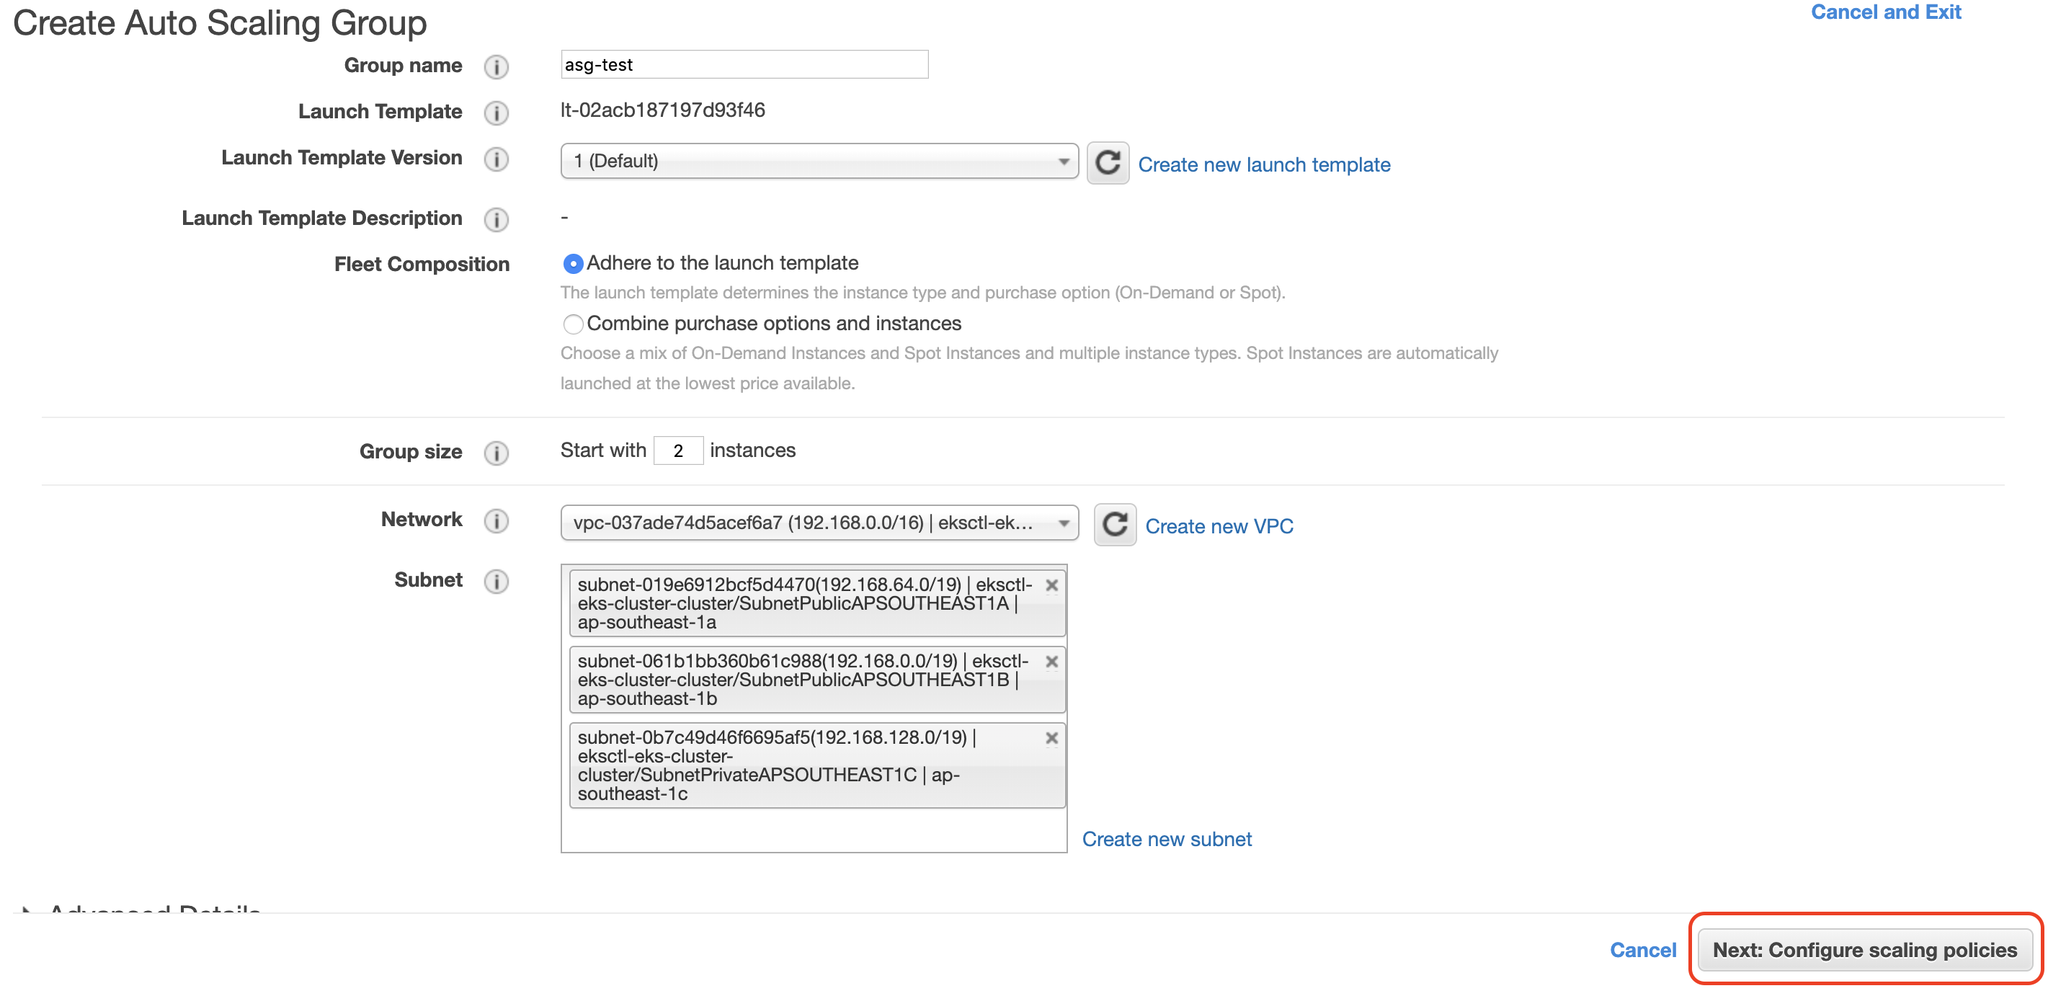
再來設置一些對應參數,好了下一步
然後設定Scaling的條件,這裡是CPU使用率50以上
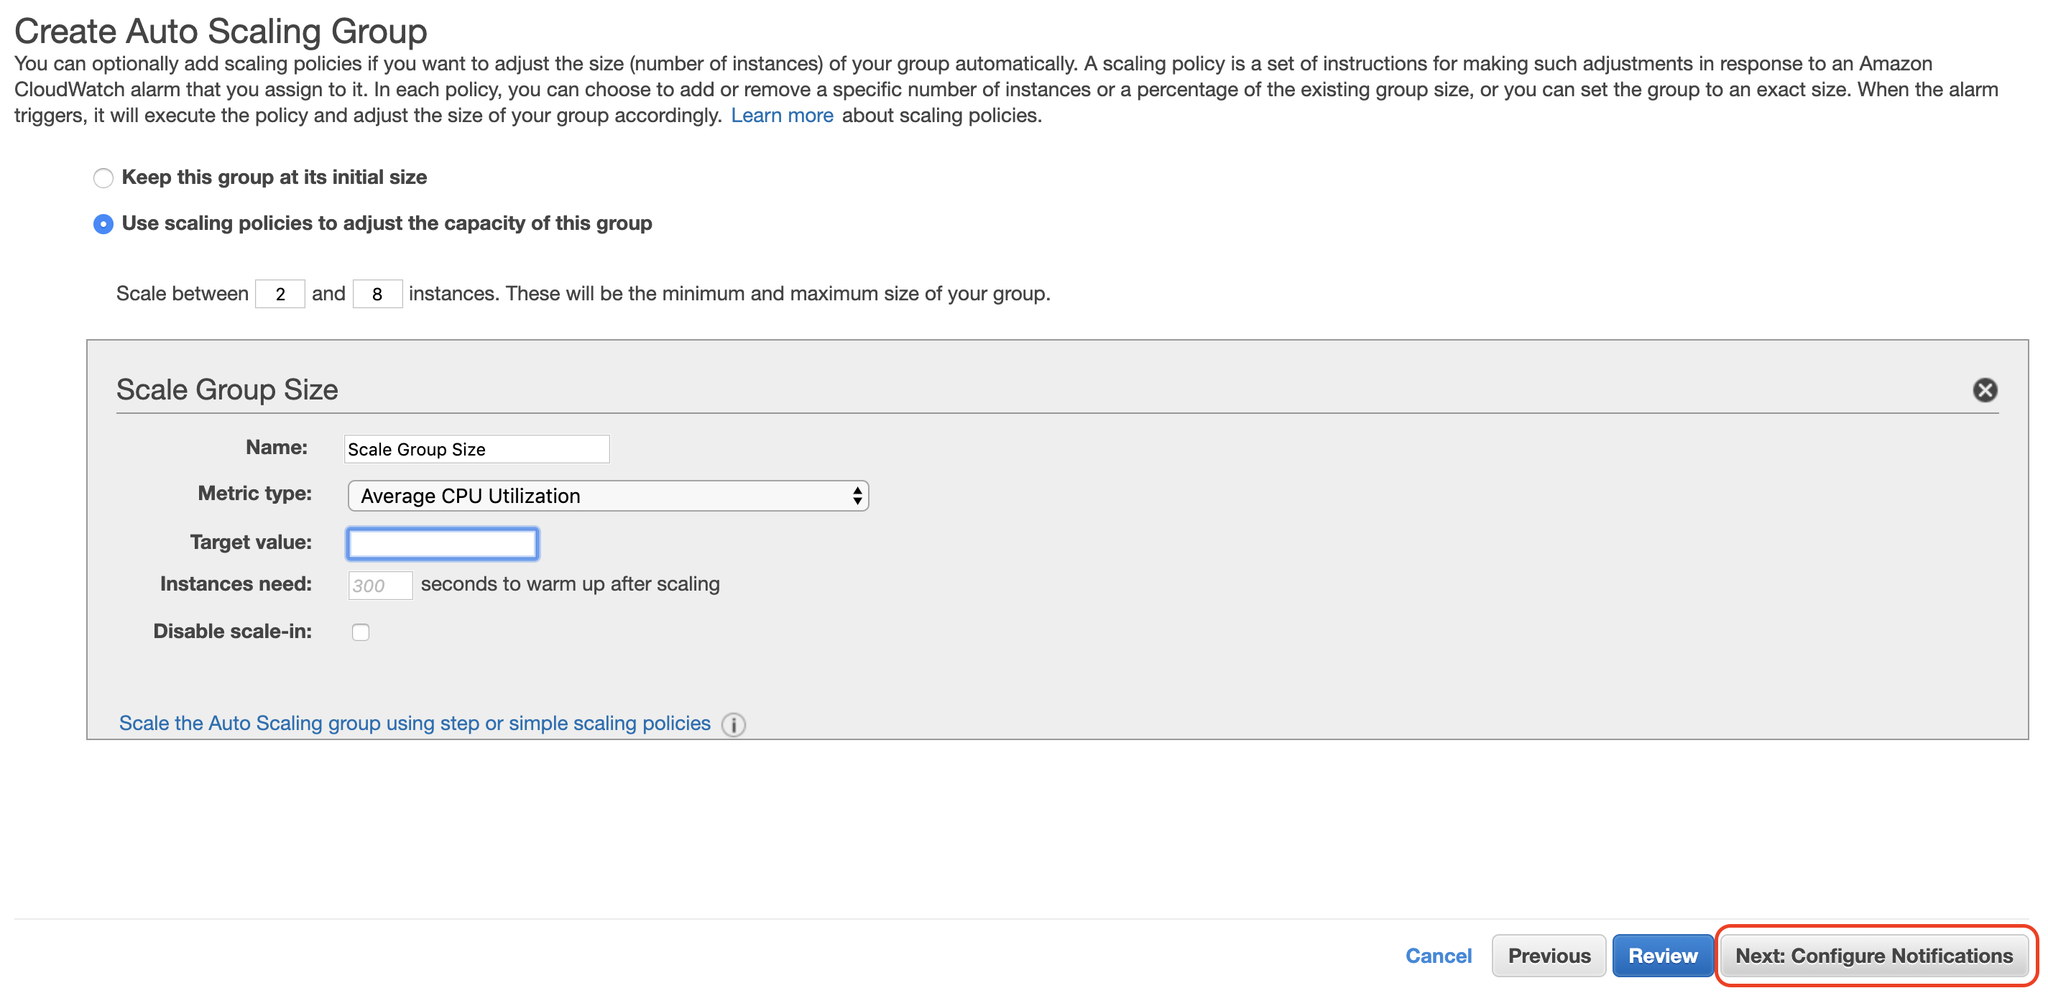
好了就下一步,直接都Next,成功創建會長這樣
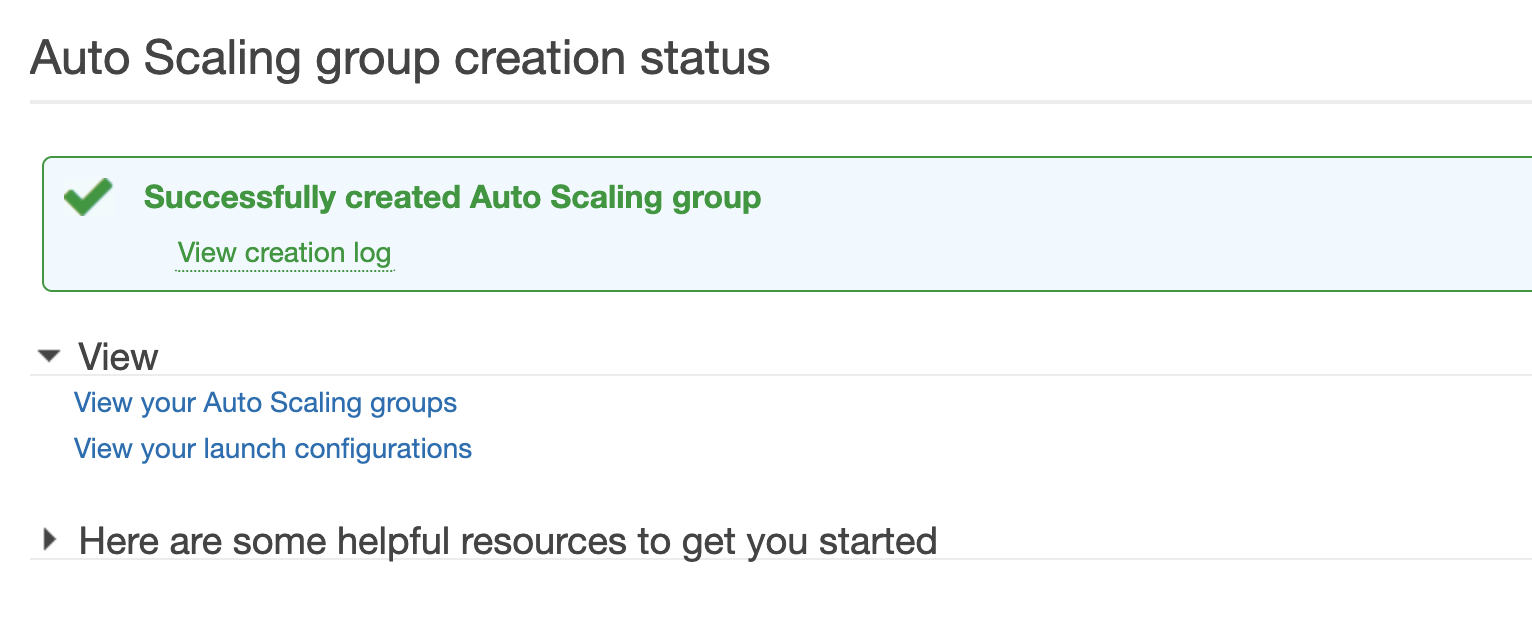
可以在ASG的面板看已經有的ASG狀態

因為這裡是設置eksctl-eks-cluster-nodegroup-ng-4241ab92,要將這名稱放到剛剛的YAML中
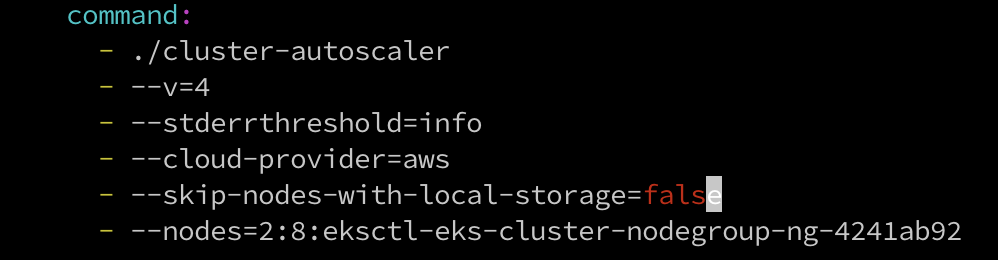
設置集群環境變數
$STACK_NAME=$(eksctl get nodegroup --cluster eks-cluster -o json | jq -r '.[].StackName')
$INSTANCE_PROFILE_ARN=$(aws cloudformation describe-stacks --stack-name $STACK_NAME | jq -r '.Stacks[].Outputs[] | select(.OutputKey=="InstanceProfileARN") | .OutputValue')
$ROLE_NAME=$(aws cloudformation describe-stacks --stack-name $STACK_NAME | jq -r '.Stacks[].Outputs[] | select(.OutputKey=="InstanceRoleARN") | .OutputValue' | cut -f2 -d/)
檢視變數
$echo $STACK_NAME
eksctl-eks-cluster-nodegroup-ng-4241ab92
$echo $ROLE_NAME
eksctl-eks-cluster-nodegroup-ng-4-NodeInstanceRole-1KCFHMZZOZZED
建立ASG Policy
$mkdir asg_policy
$vim asg_policy/k8s-asg-policy.json
{
    "Version": "2012-10-17",
    "Statement": [
    {
        "Effect": "Allow",
        "Action": [
        "autoscaling:DescribeAutoScalingGroups",
        "autoscaling:DescribeAutoScalingInstances",
        "autoscaling:SetDesiredCapacity",
        "autoscaling:TerminateInstanceInAutoScalingGroup",
        "autoscaling:DescribeTags"
        ],
        "Resource": "*"
    }
    ]
}
套用ASG Policy
$aws iam put-role-policy --role-name $ROLE_NAME --policy-name ASG-Policy-For-Worker --policy-document file://asg_policy/k8s-asg-policy.json驗證ASG Policy
$aws iam get-role-policy --role-name $ROLE_NAME --policy-name ASG-Policy-For-Worker
{
    "PolicyName": "ASG-Policy-For-Worker",
    "RoleName": "eksctl-eks-cluster-nodegroup-ng-4-NodeInstanceRole-1KCFHMZZOZZED",
    "PolicyDocument":
    {
        "Version": "2012-10-17",
        "Statement": [
            {
                "Resource": "*",
                "Effect": "Allow",
                "Action": [
                    "autoscaling:DescribeAutoScalingGroups",
                    "autoscaling:DescribeAutoScalingInstances",
                    "autoscaling:SetDesiredCapacity",
                    "autoscaling:TerminateInstanceInAutoScalingGroup",
                    "autoscaling:DescribeTags"
                ]
            }
        ]
    }
}
套用CA設定
$kubectl apply -f cluster_autoscaler.yml
serviceaccount/cluster-autoscaler created
clusterrole.rbac.authorization.k8s.io/cluster-autoscaler created
role.rbac.authorization.k8s.io/cluster-autoscaler created
clusterrolebinding.rbac.authorization.k8s.io/cluster-autoscaler created
rolebinding.rbac.authorization.k8s.io/cluster-autoscaler created
deployment.extensions/cluster-autoscaler created
可以看log
$kubectl logs -f deployment/cluster-autoscaler -n kube-system新增一個nginx的YAML
$vim nginx.yaml
apiVersion: extensions/v1beta1
kind: Deployment
metadata:
    name: nginx-to-scaleout
spec:
    replicas: 1
    template:
    metadata:
        labels:
        service: nginx
        app: nginx
    spec:
        containers:
        - image: nginx
        name: nginx-to-scaleout
        resources:
            limits:
            cpu: 500m
            memory: 512Mi
            requests:
            cpu: 500m
            memory: 512Mi
套用nginx
$kubectl apply -f nginx.yaml
deployment.extensions/nginx-to-scaleout created
$kubectl get deploy
NAME                READY   UP-TO-DATE   AVAILABLE   AGE
nginx-to-scaleout   1/1     1            1           21s
接著我們Scale up
$kubectl scale --replicas=10 deployment/nginx-to-scaleout
deployment.extensions/nginx-to-scaleout scaled
檢查Pod狀態
$kubectl get po
NAME                                 READY   STATUS              RESTARTS   AGE
nginx-to-scaleout-5bd9d899c7-4jgwd   0/1     ContainerCreating   0          9s
nginx-to-scaleout-5bd9d899c7-9bjh8   0/1     Pending             0          9s
nginx-to-scaleout-5bd9d899c7-9cvv4   1/1     Running             0          9s
nginx-to-scaleout-5bd9d899c7-cttmv   0/1     Pending             0          9s
nginx-to-scaleout-5bd9d899c7-k9222   0/1     Pending             0          9s
nginx-to-scaleout-5bd9d899c7-rlwfh   1/1     Running             0          9s
nginx-to-scaleout-5bd9d899c7-svp9w   0/1     ContainerCreating   0          9s
nginx-to-scaleout-5bd9d899c7-ttd27   1/1     Running             0          71s
nginx-to-scaleout-5bd9d899c7-vhhh4   0/1     ContainerCreating   0          9s
接著我們看下EC2的Dashboard
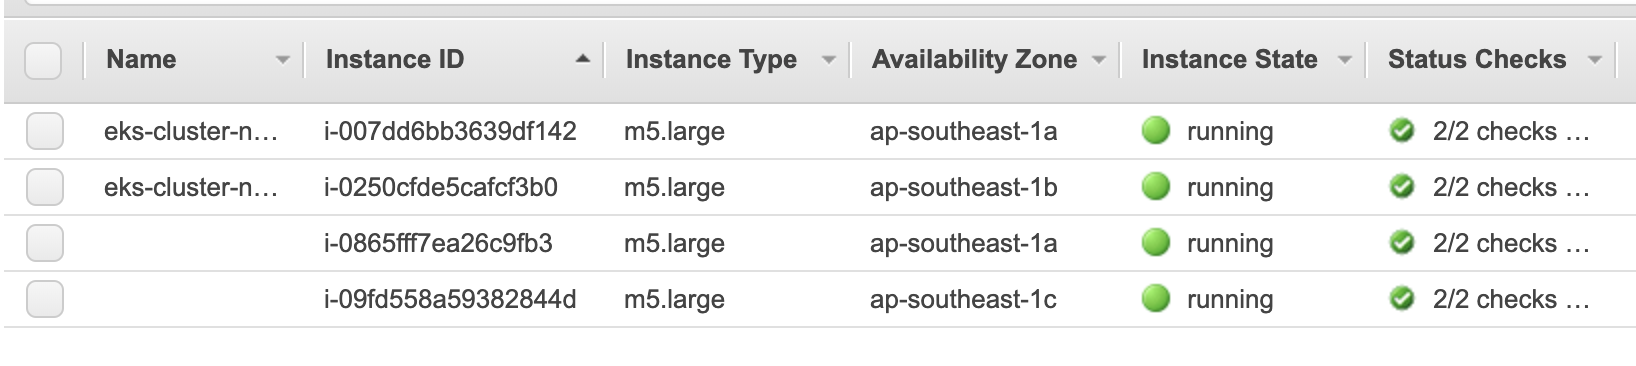
可以注意到多了兩個Node,這是CA造成的結果!
好了我們將它恢復原狀
$kubectl delete -f cluster_autoscaler.yml
serviceaccount "cluster-autoscaler" deleted
clusterrole.rbac.authorization.k8s.io "cluster-autoscaler" deleted
role.rbac.authorization.k8s.io "cluster-autoscaler" deleted
clusterrolebinding.rbac.authorization.k8s.io "cluster-autoscaler" deleted
rolebinding.rbac.authorization.k8s.io "cluster-autoscaler" deleted
$kubectl delete -f nginx.yaml
deployment.extensions "nginx-to-scaleout" deleted
OK,測試成功~
小結
今天我們學習到了如何安裝Helm,並透過Helm去部署我們的應用。再來是HPA及CA的部分,HPA透過Scale up Pod而能有效的平均分攤k8s元件的loading,CA則是透過Scale up Node而能有效的降低對單個節點上的負擔,這兩個功能算蠻實用的個人覺得。明天會介紹EBS及EFS的使用,並比較兩者的差異,我們明天見!
參考資料
- ●
- ●
- ●
- ●
- ●